
How to build a Nixie Clock on Arduino
How to control a Nixie Tubes Clock with Arduino
In this small tutorial we will look on a simple example on how to control a Nixie Tubes Clock with an Arduino board.Nixie Tubes at a time were the only way to display numbers back in the 50s and 60s, before VFD and seven segments displays.Today they are highly sought after for their retro and steampunk look.Using Nixies with Arduino is fairly straightforward, but you’ll need a few exotic parts.Let’s read on!
The parts you will need
- A Nixie Tube, in this tutorial we will use a Soviet era IN-14 (ИН-14), but it can be substituted for any other Tube
- A Nixie driver IC (KM155ID1, SN74141, 7441, etc.)
- 12V 1A Power Supply
- 12V to 170~180V Nixie Tubes Power Supply
- A 20k resistors
- Arduino Uno or any other 5V Arduino (Nano or Mega)
Also we will need the tools like Multimeter, screwdrivers, etc. and a lots of jumper cables.
Getting started with Nixie Tubes
Before you get started, you need to get acquainted with the Nixie Tubes. Each digit of the Tube has an ending pin at the bottom of it. If any of these leads are connected to the ground, the digit will glow; provided the anode of the Tube is supplied with 170 to 180 volts. This “ignition voltage” differs for each Tube but is generally in this range. You can easily locate the anode of the Tube as it is generally situated at the back, and it’s structurally reinforced. This makes it very distinguishable from the other pins.
WARNING: Do not ever connect your Tube between a high voltage source and the ground. 170V+ is very high voltage. Always connect a current limiting resistor between the anode and your power source. 20k is a good value for the IN-14. In any case, proceed with caution!
TIP: A typical female 0.1? jumper cable should be a tight fit around the Nixie leads, so you can use them to run your initial Tube tests.
IN-14 tube connected to 0.1? female jumper cable
Selecting Power Supply
For most Nixie Tubes you will need a 170V Power Supply. EBay, Aliexpress or other shop should have readily available modules for devices like Nixie Clocks.
A Nixie Tubes modules Power Supply listing on eBay
These are good enough to get started in the Nixie Tubes Clocks hobby but they are generally poor quality and might die very early. Boosting 12V to 170~180V is very taxing on electronic components (MOSFET, magnetics, etc.) and the cheap Power Supplies are just not reliable enough. It is highly recommend that you invest in a quality Power Supply, such as the one depicted below:
170V High Voltage Nixie Power Supply
Here is a link to the store, where you can purchase the kind of Power Supply: https://www.tindie.com/products/tonyp7/170v-high-voltage-nixie-power-supply/
These kits usually require an input voltage between 5 to 12V, and incidentally 12V is a good value to power your Arduino from the barrel jack and onto the integrated 5V voltage regulator. From a single 12V Power Source you can therefore power both your Arduino and the Nixies, while maintaining the same ground level. 12V is a popular value for a lot of consumer electronics so chance are you have one of these wall warts hanging around in your home.
12V Power Supply salvaged from home apliance
The Nixie Tubes driver
Many companies produced Nixie drivers, but today they are no longer on their catalogs. That being said, you can easily find “new old stock” on the eBay or any other place. These chips are 5V logic and transform a 4 bit input (0000 to 1111) into a given output pin. They are more or less a typical BCD to decimal decoder that you can buy today for 7 segment displays, except that they are built in with High voltage transistors.
K155ID1 russian Nixie driver
The pinout for the driver is as following:
74141 IC typical pinout
Known typical Nixie drivers include:
- Texas Instruments SN74141
- MSI DM74141
- xUSSR K155ID1
- and many more.
A complete list can be found here if you are interested in these chips.
The Truth table for the driver is as following:
| Input | Output | |||
| D | C | B | A | |
| 0 | 0 | 0 | 0 | 0 |
| 0 | 0 | 0 | 1 | 1 |
| 0 | 0 | 1 | 0 | 2 |
| 0 | 0 | 1 | 1 | 3 |
| 0 | 1 | 0 | 0 | 4 |
| 0 | 1 | 0 | 1 | 5 |
| 0 | 1 | 1 | 0 | 6 |
| 0 | 1 | 1 | 1 | 7 |
| 1 | 0 | 0 | 0 | 8 |
| 1 | 0 | 0 | 1 | 9 |
Putting all parts together schematiclally
Connecting it all together should be an easy task. The difficulty here is the amount of wires: it’s easy to mix up input A, B, C & D of the driver chip since they are in a completely random order (A, D, VCC, B, C – who thought that was a good idea?), and the output to connect to the Nixies don’t seem to make any more sense. The process should be proceeded with care and you’ll have a working circuit in no time!
The complete Nixie Tube schematic with Arduino
Key points on this schematic:
- Connect Arduino pins 10, 11, 12 & 13 to the pins A, B, C & D of the Nixie driver.
- You can connect the 12V source directly on the Arduino by using the “VIN” pin and any ground pin.
- Use the same 12V source to power the step up converter.
- Use the 5V pin of the Arduino to power the Nixie driver.
- Don’t forget the 20k resistor on the anode of the Nixie!
In real life you may get some like this mess!
Final uploading the code to Arduino
Finally, we are uploading the code on the Arduino board. Don’t forget to disconnect the board from the 12V source first! Having two source input (from the USB and from the external 12V) might damage the Arduino. Arduino platform uses C++ as a programming language. So here is a simple code fragment to control a Nixie from the board, the Arduino.
C++ code
|
1
2
3
4
5
6
7
8
9
10
11
12
13
14
15
16
17
18
19
20
21
22
23
24
25
26
27
28
29
30
31
32
33
34
|
uint8_t currentValue = 0;
//Use pins 10, 11, 12 & 13 of Arduino
//Connect to pins A, B, C & D of your SN74141 Nixie driver chip
#define A 10
#define B 11
#define C 12
#define D 13
void setup() {
pinMode(A, OUTPUT);
pinMode(B, OUTPUT);
pinMode(C, OUTPUT);
pinMode(D, OUTPUT);
nixieWrite(A, B, C, D, 0);
}
void nixieWrite(uint8_t a, uint8_t b, uint8_t c, uint8_t d, uint8_t value){
//D is most significant bit
//A is least significant bit
digitalWrite(d, (value & 0x08) >> 3);
digitalWrite(c, (value & 0x04) >> 2);
digitalWrite(b, (value & 0x02) >> 1);
digitalWrite(a, value & 0x01);
}
void loop() {
delay(1000);
currentValue++;
if(currentValue > 9) currentValue = 0;
nixieWrite(A, B, C, D, currentValue);
}
|
The pins chosen (10, 11, 12, 13) are completely arbitrary and of course can be substituted by the pins of your choice.
One interesting bit about the code is the “nixieWrite” function: it transforms a decimal number into its individual bit components by isolating the bit with a bitwise and operation; then the result is shifted according to the position.
Take number 9 for instance, or 1001 in binary. The result will be:
- D: 1001 AND 0x08 (1000) = 1000. 1000 shifted 3 bits: 1
- C: 1001 AND 0x04 (0100) = 0000. 0000 shifted 2 bits: 0
- B: 1001 AND 0x02 (0010) = 0000. 0000 shifted 1 bit: 0
- A: 1001 AND 0x01 (0001) = 0001. no need to bit shift this one.
Wrap up the Clock
That’s pretty much all you need to build your first Nixie Tubes Clock using the Arduino. As was shown in this example, only one Nixie Tube was used, but you can build a 2, 4, 6 or even 8 Tubes Clock. Nixies are fairly easy to use provided you have all the components needed and the patience to painstakingly wire everything one by one. As a single Nixie requires at the very least 17 wires (10 for the digits, 6 for the driver’s input including VCC and GND, and one for the 180V anode), it can get rapidly messy. So a good PSB design is what it takes to avoid the mess.
As a matter of fact, without the IC driver it gets even more messy. You can drive Nixie with High voltage transistors such as a BF259 “Bipolar (BJT) Transistor NPN 300V 100mA 90MHz 5W”, but you will need one for each digit!
That being said, there is nothing quite like this amazing orange glow and all this work will definitely give a unique look to your projects!
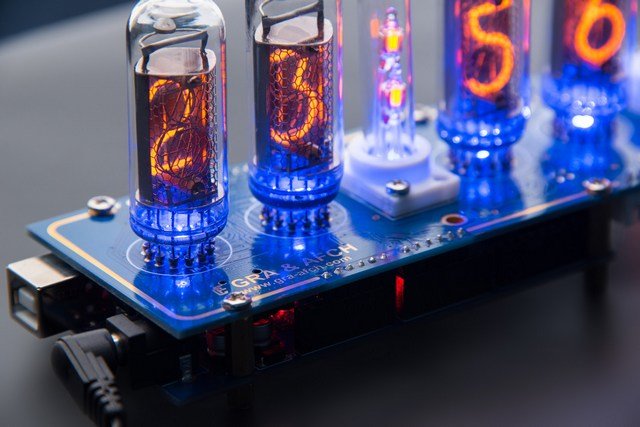
Gra & Afch Nixie Clocks
We here at Gra & Afch Design Clocks using the Arduino platform as well as our own solutions.
Our Arduino Nixie Clocks presented in a separate section in our shop among other models.
And you can come visit it and look anytime: Arduino Shield Nixie Clocks, Nixie Clocks in Cases, Nixie Clocks without Cases, DIY KITs for Nixie Clocks.