How to Download the Flash Memory Contents (sketch) from an Arduino
Why might you need to read the FLASH memory from an Arduino?
The program, commonly referred to as a “sketch” in Arduino terminology, is stored in the FLASH memory and executed by the Arduino while it is in the powered-on state.
More precisely, the FLASH memory stores the compiled version of the sketch written in C++. Therefore, having a copy of the FLASH memory’s contents can be useful if you want to create a backup of your Arduino-based device (e.g., in case the Arduino fails), or if you simply want to duplicate your device. If you don’t have access to the original source code of the sketch loaded onto your Arduino, if the code has been lost, or if you prefer not to recompile it, the only option is to read the contents of the FLASH memory and then reprogram it with this extracted data.
Can’t I read the content of my Arduino’s FLASH memory using the Arduino IDE?
Despite the release of the second version of the Arduino IDE, such functionality has not been implemented. Furthermore, direct writing of the compiled version of the sketch directly into the FLASH memory is not provided for. Yes, during the compilation process of the sketch, the Arduino IDE saves the compiled version of the sketch in a *.hex file in a temporary folder. However, without recompiling the source code of the sketch, you won’t be able to write it back to your Arduino. Moreover, a sketch is not always just a single file; it often consists of multiple files and almost always relies on the use of external libraries. Therefore, if you don’t plan to make changes to the program running on your Arduino, it’s much more convenient to work with just one file — the compiled sketch saved in a *.hex file.
How can I save the program loaded into an Arduino?
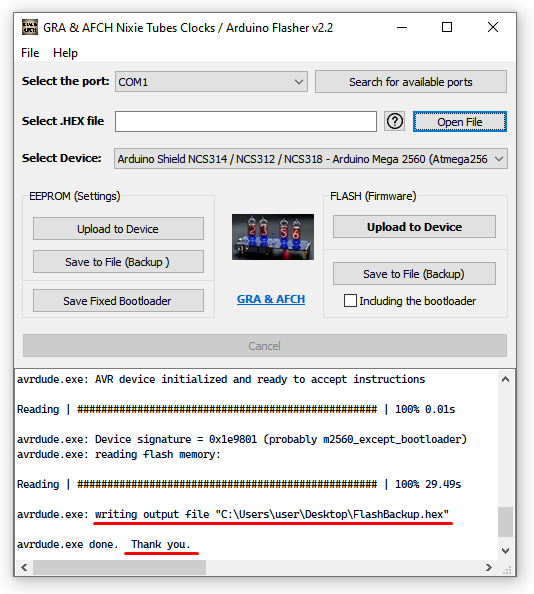
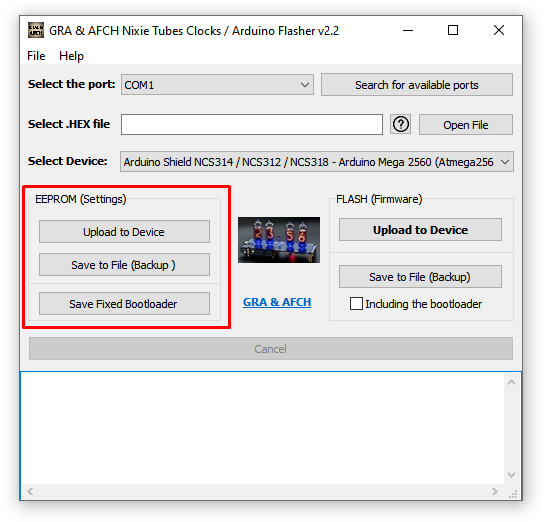
The built-in Arduino bootloaders not only enable the programming of the Arduino but also the extraction of its program from the Arduino’s memory. While it’s possible to read the program from an Arduino using the command-line utility Avrdude, this approach is not the most convenient and is not preferred by everyone. That’s why GRA & AFCH Flasher was created, which allows for reading and writing the FLASH and EEPROM memory in Arduino using a simple and user-friendly graphical interface. You can download the latest version here: https://github.com/afch/GA_Flasher/releases
GA Flasher v2.2.2 (1110 downloads)
Here are a few words about using GA Flasher for reading and writing FLASH content in Arduino
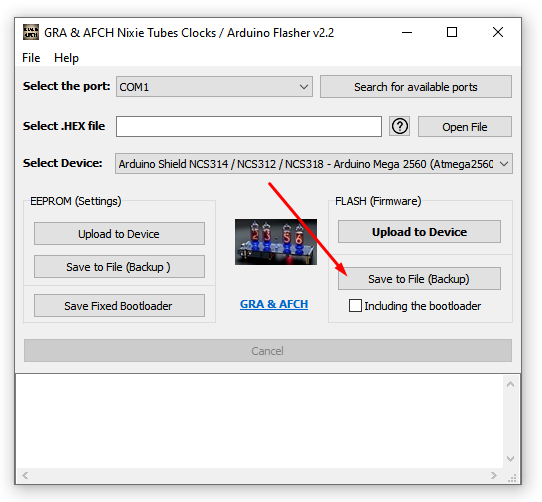
The FLASH memory area where the bootloader, responsible for enabling FLASH memory read and write via USB, is stored is write-protected. This means that if you read the entire FLASH memory (including the bootloader) and attempt to write it back via the Arduino’s USB port, the bootloader won’t be able to overwrite itself. Therefore, if you plan to write a saved program from FLASH to an Arduino that already has a built-in bootloader (as all Arduino boards do out of the box), you need to read the entire FLASH memory except for the area where the bootloader is stored.

For this purpose, GA Flasher v2 introduces a checkbox labeled “Including the bootloader“, which you should leave unchecked. However, if you plan to transfer firmware to a clean microcontroller that hasn’t had a bootloader loaded into it, then you should check this checkbox. But to write a complete FLASH memory dump to a microcontroller that doesn’t yet have a bootloader, you’ll need an external programmer. Another Arduino board can also serve as an external programmer. Instructions on how to load a bootloader onto a clean microcontroller can be found here.: https://gra-afch.com/how-it-works/how-to-burn-or-update-bootloader-in-arduino-ide/
Here’s how to save and write to the EEPROM memory of an Arduino through the USB port:
EEPROM is non-volatile memory that retains its content even when power is disconnected. Typically, it’s used to store device settings and accumulated data during the device’s operation.
– Arduino UNO: Due to its limited FLASH memory, the UNO’s default bootloader, “Optiboot,” does not support reading or writing to the EEPROM through the USB port. Therefore, with the default bootloader, it is impossible to perform these operations.
– Arduino Mega 2560: Even though the Mega 2560 has more memory than the UNO, it’s not straightforward either. The default bootloader for the Mega, named “stk500boot_v2_mega2560“, can write to the EEPROM memory effectively through the USB port. However, it contains a bug that prevents it from reading the entire EEPROM memory. Fortunately, there is a corrected version of the bootloader for the Arduino Mega 2560, which allows both reading and writing to the entire EEPROM without issues. You can download it here:
Fixed bootloader for Arduino Mega 2560 (551 downloads)
To learn how to update the bootloader on the Arduino Mega 2560, you can refer to the following link:
https://gra-afch.com/how-it-works/how-to-burn-or-update-bootloader-in-arduino-ide/
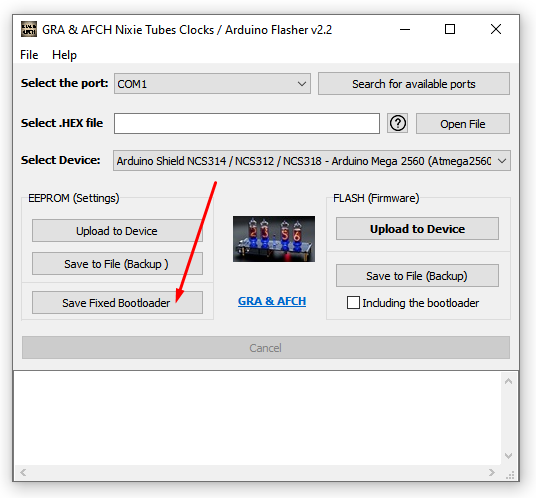
By the way, GRA & AFCH Flasher includes a corrected Bootloader for an Arduino Mega 2560 and enables a convenient way to export and replace the bootloader used by the Arduino IDE. This allows you to use the corrected bootloader when executing the “Burn bootloader” command in the Arduino IDE.